Redundant zero downtime deployments using docker and VPSs
Not the sexiest title, but there we have it.
This is a blog post explaining how I host an application on two VPSs which is able to withstand application outages/updates, server outages, geographic outages and database outages. That’s a lot to ask for, but it’s honestly not as hard as it sounds. Before you get fizzy with Terraform, no, this does not use Terraform. We’re using VPSs. It’s Shell and Go.
This is my first iteration which I got working today. There’s lots of changes to come.
Some context
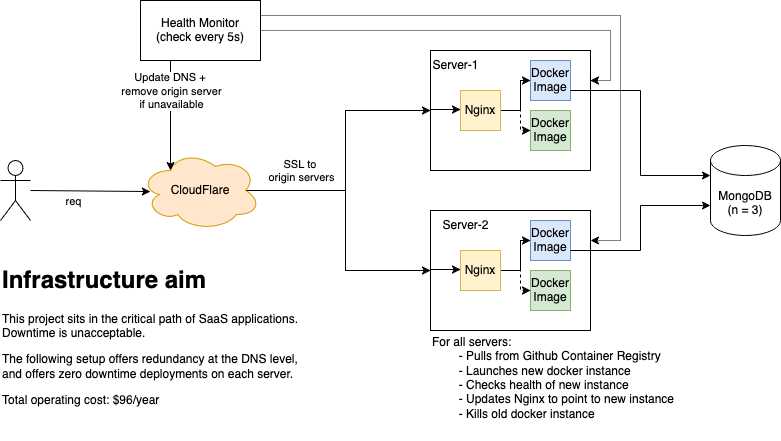
I’ve been working in the evenings on a service which sits in the critical path of SaaS tools. This means that zero downtime is a requirement.
Sure I’ve used AWS and Terraform at work, but I’d rather run my own stack. That’s sort of the appeal of building your own SaaS, and given this project has customers, it’s time to go from n=1 to n=2 and have redundancy.
The requirements are therefore:
Each server must be able to run a zero downtime deploy.
If the server goes down, we need a secondary server which can take over.
We need SSL between the reverse proxy and the origin servers.
Servers must be stateless.
What the above roughly translates to is the following:
The codebase needs to be designed to be stateless in the first place.
We need to be able to manipulate DNS to swap in/out servers.
- We need some sort of watchdog process.
We need to be able to manipulate docker instances to swap in/out images.
We can’t use LetsEncrypt unless we want to share a certificate.
From an infrastructure point of view, this ends up looking something like this:
Now lets build it
For this there’s three main parts:
Blue/Green deploys to swap out new versions of the application.
The DNS load balancing
Figuring out the SSL from CloudFlare to the origin servers
Please keep in mind this is still all a work in progress. Ultimately there’s two types of plans: those that are perfect, and then those that get done. This is the latter.
Blue/Green deploys
To keep things as standard as possible, we’re using Docker. Each server is currently set up with Docker and Nginx. That’s it. The idea is to eventually move Nginx into Docker too, which would make having multiple applications on these servers way easier to manage, but that’s for another day.
The following boot script is copied to each machine and runs on deploy. It pulls the latest image, spins it up, updates nginx with the new container port, restarts nginx, then kills the old image. Pretty simple stuff. That’s ~30 lines of code, and we have zero downtime deploys sorted. Nice.
#!/bin/bash
IMAGE_NAME="ghcr.io/<username>/<project>:latest"
NGINX_CONFIG="<project>.conf"

docker pull $IMAGE_NAME


OLD_CONTAINER_ID=$(docker ps -a -q -f "ancestor=$IMAGE_NAME" | tail -n1)

# Run the new container using the image
docker run -d -p 127.0.0.1::8080 --restart always $IMAGE_NAME

NEW_CONTAINER_ID=$(docker ps -q -f "ancestor=$IMAGE_NAME")
NEW_CONTAINER_PORT=$(docker inspect -f '{{range .NetworkSettings.Ports}}{{(index . 0).HostPort}}{{end}}' $NEW_CONTAINER_ID | head -n 1)

# Give the service time to start up
sleep 5

HTTP_STATUS=$(curl -o /dev/null -s -w "%{http_code}" http://localhost:$NEW_CONTAINER_PORT/health)
if [ "$HTTP_STATUS" -eq 200 ]; then
    echo "New service started successfully"
else
    echo "Request failed with status: $HTTP_STATUS. Exiting."
    exit 1
fi

# Update nginx with the new port
sed -i "s#.*proxy_pass.*#        proxy_pass         \"http://localhost:$NEW_CONTAINER_PORT\";#" /etc/nginx/sites-enabled/$NGINX_CONFIG

# Gracefully restart Nginx (TODO: we could check this was successful...)
sleep 1
sudo nginx -s reload

echo "stopping old container"
docker stop $OLD_CONTAINER_ID
docker rm $OLD_CONTAINER_ID
But how do we get the servers to run this? I’m currently using a Makefile, but the idea is to move this over to Github Actions, so when we merge into the master branch it runs automatically. Then it’ll really be a hands-off approach to deployments.
For now, this is the Makefile I’m using which cycles through a list of IPs, pushes up the latest boot script, and executes it. Simple stuff.
docker-deploy:
	@for ip in <127.0.0.1> <your.second.server.ip>; do \
		echo "Deploying to $$ip..."; \
		scp ../deploy/boot.sh ubuntu@$$ip:~; \
		ssh -t ubuntu@$$ip 'bash boot.sh'; \
	done
DNS Load Balancing
This might sound complicated, but it’s really not. I have a Go application which has a list of IPs. Every 5 seconds it hits a /health endpoint. If it’s down, remove the DNS entry, if it’s up, re-add it.
By default, if you have multiple A or AAAA records pointing to an IP, CloudFlare will Round Robin requests to those origin servers. Yes, CloudFlare does offer load balancing, but it’s 3x the cost per month of the entire stack.
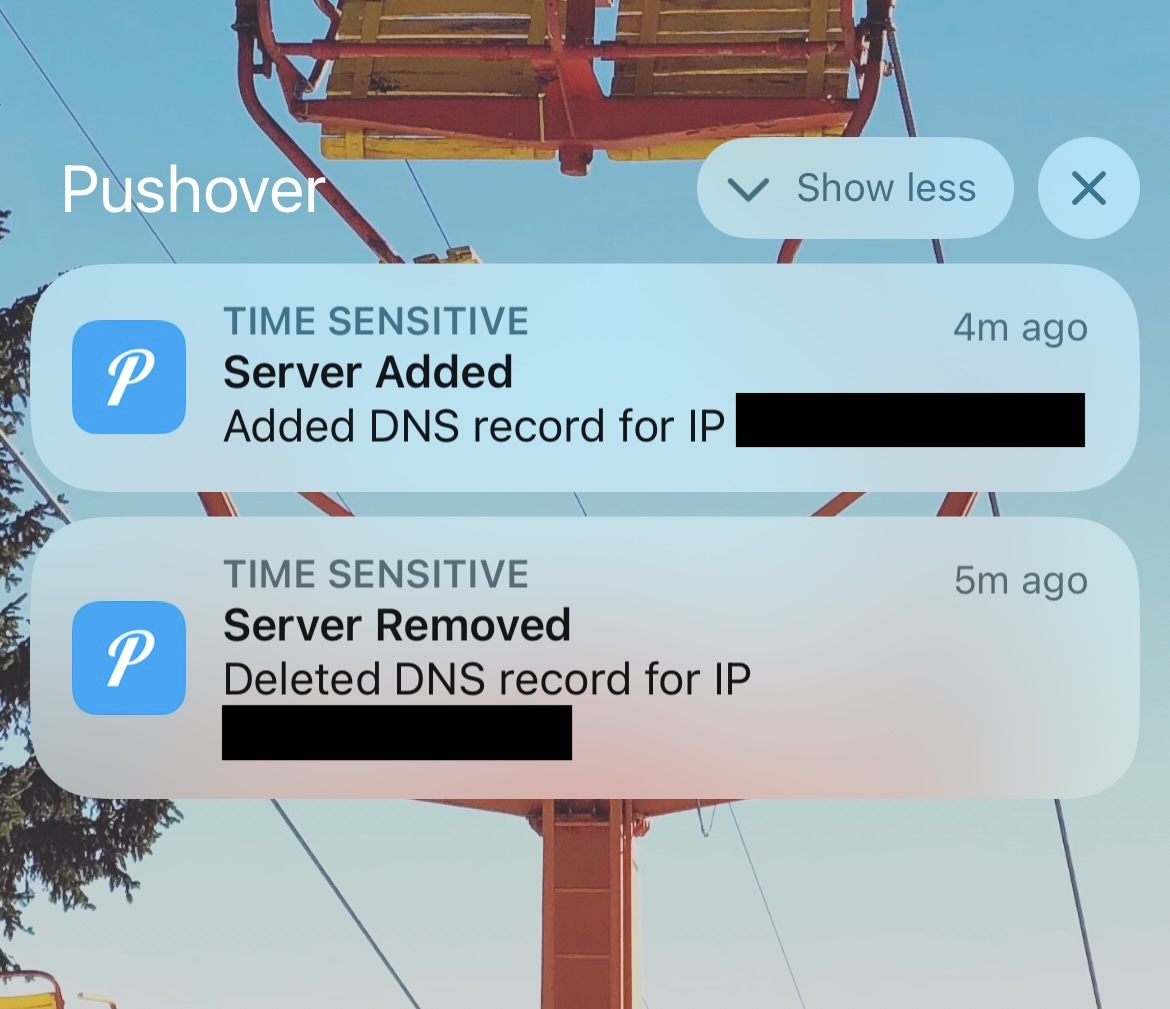
As an added bonus, this Go application sends my phone a time sensitive push notification when it takes action, so I’m always aware of what’s happening at a DNS level.
The fun part here is switching off a server, getting these push notifications, and seeing no impact to your service. It works flawlessly.
How to deal with SSL
When you set up a personal project you might set up a server with LetsEncrypt. That implies a 1:1 mapping, and within CloudFlare this would be classed as “strict mode”. The issue here is that we have multiple (2) origin servers now. We can’t blindly run the LetsEncrypt process, as each server will have its own set of certificates.
Thankfully, we can make use of CloudFlare’s Origin Server certificates (Select Zone > SSL/TLS > Origin Server).
In here, we can create a certificate that CloudFlare will use to communicate with your server. We specify the hostname, the certificate duration (CloudFlare will notify you as it approaches expiration) and then we copy the Origin and Secret .pem files. You’ll need to set this up on each server for now, however I’m likely going to make changes to the script so it uploads those on each deploy making this entire renewal process painless. Then again, if you want you can select an expiry date 15 years into the future.
Load that into your Nginx, and you should now be able to establish a secure connection from your browser right through to your origin servers.
server {
    listen 443 ssl;
    server_name <hostname>;
        ssl_certificate /your/location/cert.pem;  # Cloudflare Origin Certificate
        ssl_certificate_key /your/location/private.pem;  # Private Key for Cloudflare Origin Certificate
        ssl_protocols TLSv1.2 TLSv1.3;  # Enforce modern TLS versions
        ssl_ciphers 'TLS_AES_128_GCM_SHA256:TLS_AES_256_GCM_SHA384:ECDHE-RSA-AES128-GCM-SHA256:ECDHE-RSA-AES256-GCM-SHA384';  # Secure ciphers
        ssl_prefer_server_ciphers on;
        location / {
            proxy_pass         "http://127.0.0.1:32770";
            proxy_set_header Host $host;
            ...
        }
}
And the database?
Here we’re using hosted Mongo Atlas. They offer n=3 as a default and by having an external DB we then have stateless servers, so no need to worry about tearing down docker instances or servers going down. Yes, the irony is not lost on me here, but hosting databases gives me stress. You can’t mess those up, so I’ll happily let someone whose full time job is to manage them do it for me.